
Battery Reconditioning Epsom Salt
Reconditioning batteries with Epsom salt is an economical method to prolong and restore life to your lead-acid battery. Like me, I'm pretty frugal when it comes to paying a premium price for brand new items when I can still squeeze some juice out of my old devices.
There are several other additives you can use to prepare your electrolyte solution. However, I will obviously focus only on Epsom salt. First of all, you must ensure your safety before carrying out this process at home. Battery solutions are made from acidic liquids, so you must wear gloves and eye protection.
I've collected some of the things you need to know about Epsom salt for battery reconditioning here. I therefore invite you to continue reading this article.
Epsom Salt Battery:Why Does It Work?
I still hear rumors about the Epsom salt battery myth, and whether it works for refurbishment. I have a few thoughts on why this solution works to bring your car battery back to life.
Remember that Epsom salt has the chemical name of magnesium sulfate. This salt has many applications, there are even food grade ones. During the reconditioning process, the sulfation of the plates must be remedied.
Sulfation occurs when solid lead sulfate builds up around the battery plates. Magnesium sulfate dissolves lead sulfate buildup on lead battery plates. This allows them to regain their ability to absorb electricity and store it and then convert it into electricity. Repair is usually temporary because this buildup occurs with other failure mechanisms like loss of plate material and collection at the bottom of the battery. Obviously, Epsom salt cannot repair damaged plaques. This process is suitable for both deeply discharged batteries and dead automotive batteries.
Magnesium sulfate and lead sulfate undergo a single replacement reaction. Metallic magnesium is more reactive than lead, so it is able to replace it in the plates. Be careful, magnesium sulphate is very soluble in water. Thus, the metallic lead is gradually restored and eliminated around the plates.
The Benefits of Epsom Salt for Battery Reconditioning
Reconditioning your old batteries can bring you a few benefits. Here are a few that you can benefit from.
Considerable savings:
Reconditioning your car batteries allows you to avoid spending considerable sums. A 12 V car battery costs around 50 to 150€, or even more depending on the brand. By restoring it yourself, you can save between 25 and 50% of the selling price.
Earn a few Dollars:
How many of your neighbors have old car batteries that are undamaged but still functional? Let's say you have 10. A new battery would cost around $100, but if you recondition their batteries and charge them around $20-$50. You will earn between 200 and 500 euros for the 10 batteries. It's not bad, is it ?
By learning the concepts of Epsom salt battery reconditioning, you can start your own business and earn a decent profit.
Reduce waste:
There are millions of car owners in the world. If everyone is replacing their old car batteries, that's a staggering amount of lead-acid battery waste to dispose of. To help minimize this waste, reconditioning your 12V car batteries will be good practice.
Tips and Warnings:
I always prioritize safety, especially when it comes to chemicals. Remember that battery solutions are acidic and contain traces of metallic lead. These chemicals are harmful to our health and the environment.
Car battery solutions are mostly made up of sulfuric acid, which is very corrosive and generates fumes that you should not inhale. To protect yourself, wear the appropriate safety clothing, i.e. protective glasses, gloves and an apron.
When performing the reconditioning process, make sure you are in a well-ventilated area and have a supply of water. Also, avoid pouring the old electrolyte solution directly, as it could splash everywhere and on your clothes.
How To Recondition a Battery With Magnesium Sulphate?
The following is specific to lead acid batteries. It requires several steps but nothing insurmountable. These steps are for preparing the battery reconditioning solution you will need to complete the entire process. The guide below will walk you through the entire process, from crafting the solution to the final step to complete the process.
Source Image: www.thehowtocrew.com
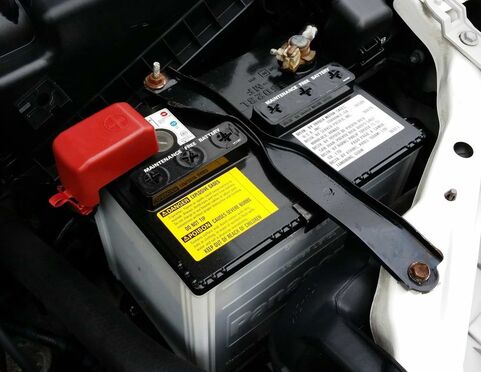
While you don't have to wait for a battery to be depleted to restore it, safety is paramount. A quick visual inspection will determine if the battery is viable for reconditioning. Check for cracks, bulges or broken parts. If the battery is not in good physical condition, it is better to buy a new one.
The process of reconditioning batteries does not require an engineering degree, but it does take patience. Most of the items you will need you probably have at home. Below is the list of essential supplies.
Materials and tools:
Equipment
- Protective clothing (eg safety glasses, chemical resistant gloves, apron).
- Tooth browse
- Steel wool or battery terminal cleaner
- Flat head screwdriver
- Funnel
- Two large buckets
Ingredients
- 1 gallon of distilled water (not tap water because of added chemicals)
- 1 pound baking soda
- 500 grams of Epsom salt
Specific Items
- Battery charger
- Voltmeter
Step-by-step Guide To Reconditioning a Battery
Restoring a battery does not require a lot of time apart from the recharge time.
Duration: 36 hours
1-Gear up and get away
Although we will not send a rocket into space, it is still science. Things can go wrong so equip yourself with protective clothing and also be sure to work in a well-ventilated area.
2-Create a cleaning solution
Use a 2:1 ratio of baking soda to water to create a runny paste. Otherwise, 2 parts baking soda to one part water. This mixture will be used to clean the battery and cover acid spills.
3-Clean the battery
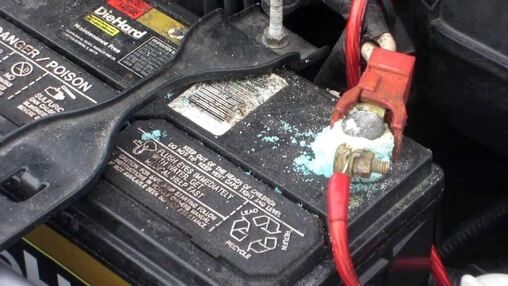
If the battery terminals are corroded, apply the battery cleaner (or a specialized battery cleaner) to the terminals and scrub away the buildup with a toothbrush. A foaming reaction means the solution is working. Use steel wool for heavily corroded batteries. Clean, wipe and dry the terminals completely.
4-Check the voltage
Connect the voltmeter. As with starting a car, the red cable connects to the positive terminal and the black cable to the negative terminal. A standard car battery contains six cells, each producing approximately 2.1 volts. Therefore, a healthy battery will show 12.6V. Between 10V and 12.6V, it means you can restore the battery. Below 10V, replace the battery instead.
5-Empty battery cells
Until now, you did not need to remove the battery from the vehicle. At this point, however, you must. Have a bucket and 200 grams of baking soda nearby. Remove the battery cover and use the flathead screwdriver to remove the caps from the cells underneath. Slowly empty the contents of the batteries, one at a time, into the bucket. You can add baking soda as you go or after you empty all the batteries. Either way, the baking soda will neutralize the battery acid so it can be safely disposed of at a facility, such as a recycling center, that accepts hazardous waste.
6-Clean the battery cells
Using the funnel, pour the cleaning solution into each element. Firmly replace the cell caps and battery cover. Then shake the battery for at least one minute. Open and dispose of the mixture in the existing old acid waste bucket.
7-Replace battery cell solution
Mix 1 liter of water with 110 grams of Epsom salt. Stir until the water runs clear. Boiled water speeds up the process but is not necessary. Using the funnel, fill the cells with the new electrolyte solution. Cover and stir again to evenly distribute the salt.
8-Recharge the battery
Perform this step gently and slowly. Settle in a safe and secure place. As an added precaution, remove the battery caps again as the electrolyte solution will heat up and may overflow during charging. Place the charger as far away from the battery as possible and plug it in at 12V/2 amps. Allow the battery to charge for 36 hours.
9-Test the battery
Unplug the charger and use the voltmeter to check the condition of the battery. Normal readings are around 12.42V. If yours is lower, charge it again for 12 hours. When you are ready, perform a load test by reinstalling the battery and putting your vehicle in the "on" position and with the high beams on. After a few minutes, test the battery again under load. If the voltmeter display shows 9.6V, congratulations! You have successfully repaired your car battery.
And There you go ! You have just restored your car battery! The lifespan of a refurbished battery depends on its age and current capacity. In theory, you should be able to repeat this process a few more times, which means battery life will be extended beyond the usual three to five years.
Duration: 36 hours
1-Gear up and get away
Although we will not send a rocket into space, it is still science. Things can go wrong so equip yourself with protective clothing and also be sure to work in a well-ventilated area.
2-Create a cleaning solution
Use a 2:1 ratio of baking soda to water to create a runny paste. Otherwise, 2 parts baking soda to one part water. This mixture will be used to clean the battery and cover acid spills.
3-Clean the battery
If the battery terminals are corroded, apply the battery cleaner (or a specialized battery cleaner) to the terminals and scrub away the buildup with a toothbrush. A foaming reaction means the solution is working. Use steel wool for heavily corroded batteries. Clean, wipe and dry the terminals completely.
4-Check the voltage
Connect the voltmeter. As with starting a car, the red cable connects to the positive terminal and the black cable to the negative terminal. A standard car battery contains six cells, each producing approximately 2.1 volts. Therefore, a healthy battery will show 12.6V. Between 10V and 12.6V, it means you can restore the battery. Below 10V, replace the battery instead.
5-Empty battery cells
Until now, you did not need to remove the battery from the vehicle. At this point, however, you must. Have a bucket and 200 grams of baking soda nearby. Remove the battery cover and use the flathead screwdriver to remove the caps from the cells underneath. Slowly empty the contents of the batteries, one at a time, into the bucket. You can add baking soda as you go or after you empty all the batteries. Either way, the baking soda will neutralize the battery acid so it can be safely disposed of at a facility, such as a recycling center, that accepts hazardous waste.
6-Clean the battery cells
Using the funnel, pour the cleaning solution into each element. Firmly replace the cell caps and battery cover. Then shake the battery for at least one minute. Open and dispose of the mixture in the existing old acid waste bucket.
7-Replace battery cell solution
Mix 1 liter of water with 110 grams of Epsom salt. Stir until the water runs clear. Boiled water speeds up the process but is not necessary. Using the funnel, fill the cells with the new electrolyte solution. Cover and stir again to evenly distribute the salt.
8-Recharge the battery
Perform this step gently and slowly. Settle in a safe and secure place. As an added precaution, remove the battery caps again as the electrolyte solution will heat up and may overflow during charging. Place the charger as far away from the battery as possible and plug it in at 12V/2 amps. Allow the battery to charge for 36 hours.
9-Test the battery
Unplug the charger and use the voltmeter to check the condition of the battery. Normal readings are around 12.42V. If yours is lower, charge it again for 12 hours. When you are ready, perform a load test by reinstalling the battery and putting your vehicle in the "on" position and with the high beams on. After a few minutes, test the battery again under load. If the voltmeter display shows 9.6V, congratulations! You have successfully repaired your car battery.
And There you go ! You have just restored your car battery! The lifespan of a refurbished battery depends on its age and current capacity. In theory, you should be able to repeat this process a few more times, which means battery life will be extended beyond the usual three to five years.
FAQs
What is the appropriate voltage for charging car batteries?
You can charge your car batteries with voltages above 12V – for example, or 15V. However, you should watch the battery closely to avoid overcharging and it should not reach 100% capacity.
If you plan to leave it charging, the proper float voltage is 13.6-13.8V.
After starting the engine, how long does it take for the battery to recharge?
A general answer to this question is around 8-99 seconds after the engine starts.
When should I add water to my battery? After or before charging?
In general, you should add water before charging the battery. During the charging process, bubbles are created which allow the water and battery acid to mix.
At what voltage level is my battery empty?
If your battery's voltage reading is less than 10V, you consider it empty or completely discharged.
How much Epsom salt does it take to restore a battery?
You need to make a mixture of 110 grams of Epsom salt and 1 liter of water. Now you need to stir the two ingredients so that the water becomes clear and transparent. Now you can use this solution in your battery.
How to desulphate the battery?
For this, you must have a battery charger with an advanced desulphation mode. Allow it to charge and you can watch the battery charge to its highest voltage. Then it will go into desulphation mode.
